Beyond the Hype: Practical AI for Everyday Engineering

The early AI surge came with bold claims, bigger hype, and a single, uneasy question: “Will developers still matter?” Fast-forward a couple of years and, while AI has grown quite capable, it's not the all-encompassing intelligence that will replace you and me. However, it did reshape the landscape in a way that if you don’t adapt, you’ll likely fall miles behind anyone that is incorporating AI into their workflow. There are certain places where AI really does shine: stuck on an obscure error? Gone are the days of scouring the depths of StackOverflow. AI tools act like a search engine on steroids, they are quite capable of presenting you with relevant, context-aware information pertaining to your need at hand. What used to cost hours or days can be solved in minutes. If you care to read along, we will explore some of the ways and techniques using which you can get good productivity boosts, and maybe save your hands from getting carpal tunnel syndrome.
Mastering the Tool
For developers, the choice of an AI assistant often boils down to a few top contenders. Claude Code (via Claude Code CLI) is a strong option, offering IDE-agnostic use, affordable plans, and reasonable rate limits. Alternatively, AI Studio/Gemini is highly praised for its free access, generous rate limits, large context window, and multimodal capabilities that include web search and code execution. A third major contender is OpenAI's Codex, an AI coding agent that can be accessed through the Codex CLI or integrated into ChatGPT Pro/Enterprise plans.
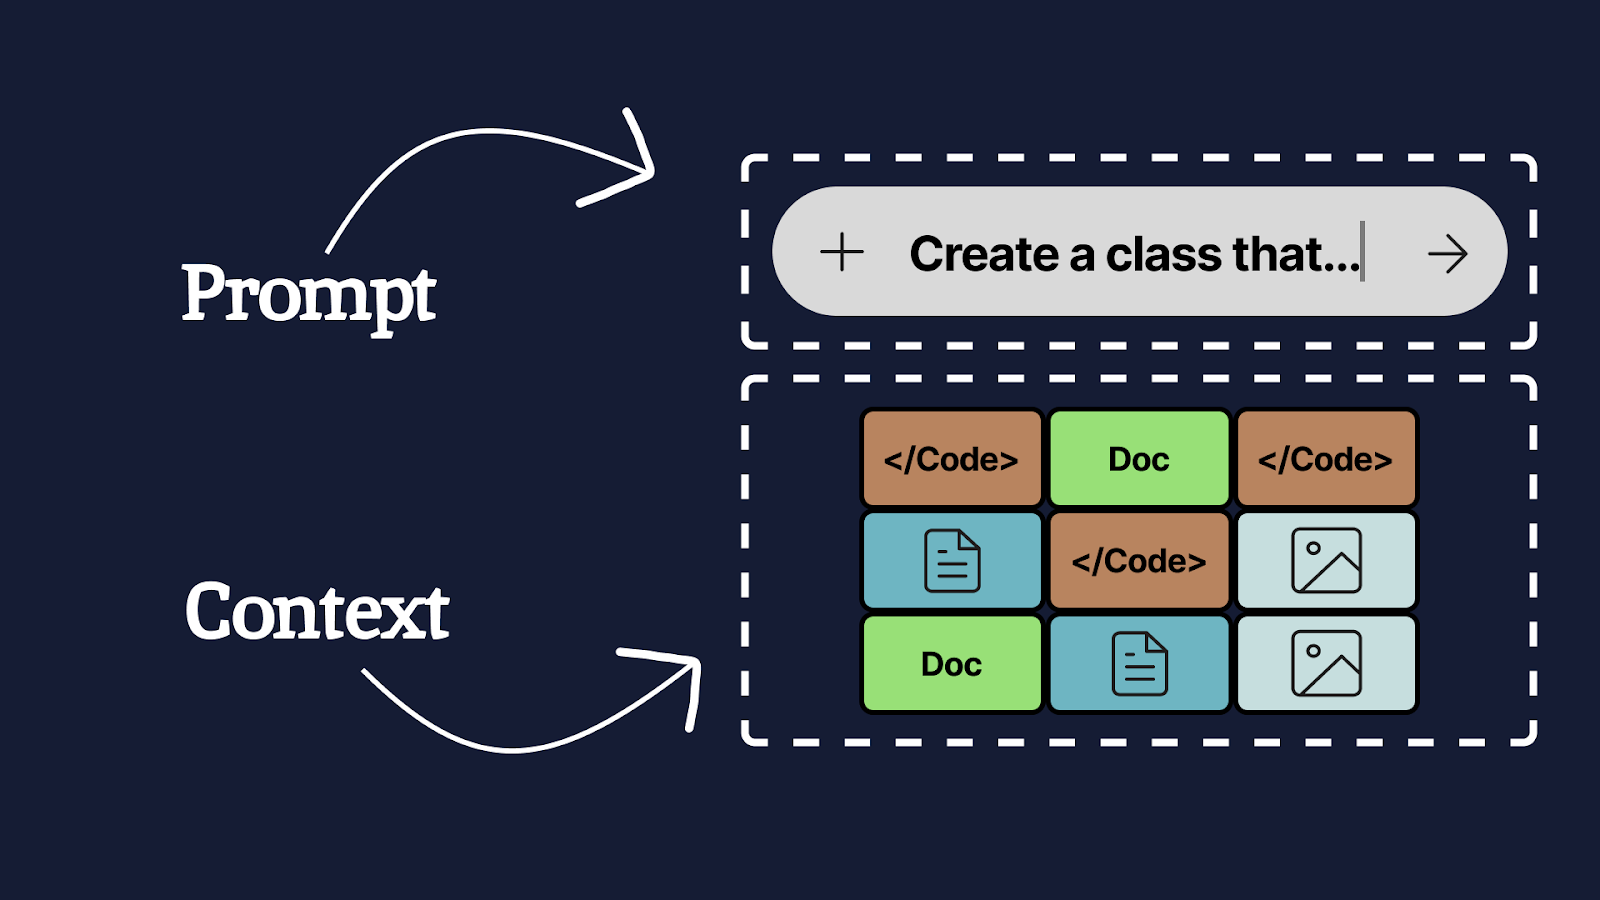
Regardless of your choice, success hinges less on the tool itself and more on Prompt and Context Engineering. The Prompt tells the tool what to do and how to do it. The Context is the full set of supportive data (code, documentation, images, etc.) needed to aid the task. Crucially, remember that while context windows are large, hitting or overfilling that window will degrade the model’s performance.
For the rest of the article, we will be using Claude Code CLI as the primary tool of choice.
Planning - Walk Before You Run
Effective planning with an AI is a three-step process designed to prime the model for success. Start by asking the AI to describe the existing class or module you intend to work on. This is vital; it primes the AI with relevant context and allows you to verify its understanding, especially useful when you are new to the module yourself. Next, introduce the task and ask it to generate a plan. "Iterate, Refine, Review" is your bread and butter here, the LLM seldom gets it right on the first try. A few iterations usually lead to a vastly superior result. You can then task the AI to convert the final plan into actionable artifacts like Jira tickets, which then can be broken down into technical tasks in a plan.md file. Once you have the plan fleshed out, you can then move on to the implementation, because a solid plan will lead to a good implementation. Note: Generating extensive planning documents can sometimes lead to "analysis paralysis," so focus on executable, granular tasks.
A thing to note here is that while you can get good results for feature implementations, over-relying on AI to solve bugs might yield bad results. As a general rule of thumb, if the agent has been unable to find the root cause of a bug, you either want to start fresh, or investigate the bug yourself and plan the fix. Once you have the fix planned out, you can use AI to help you complete the fix faster.
Enrich the Context
When you are tasked with implementing a new feature, your primary job becomes that of a context manager. You can add necessary files using the @ annotation followed by the path to the said file or folder. If you start on the frontend, you may additionally want to provide the AI with screenshots of the relevant UI components to narrow its scope. For full-stack changes, you can provide documentation on the required endpoints (or even ask the AI to draft that documentation if it's missing). It is highly effective to add the feature’s design document, relevant tickets, technical conventions that you follow, and even a summary of conversations you had with stakeholders (e.g., "The UX designer confirmed that the button should become visible once the user starts scrolling down"). If the AI starts hallucinating, or you're simply not satisfied, the /clear command is your friend; start a new session with only the most relevant, current context to prevent poor output from previous conversational bloat.
Not happy?
When the AI struggles with a large request, or if you are working on a new module, you need to switch from a conversational approach to a focused, step-by-step guidance system. Guide the AI with a series of discreet, well-scoped tasks, such as: "Create the endpoint," "Modify the service," "Implement the data mapper," or "Update the documentation." The tasks should be very granular, like how one breaks a story ticket into task tickets. Guiding the AI in this manner keeps you, the developer, in control, making it easier to review and iterate on changes along the way. This approach dramatically reduces the likelihood of the AI hallucinating because the task is so well-defined.
When everything looks good, it's time for the final quality check. Write test cases by hand for the feature that you implemented, and then ask AI to implement the tests. Some developers prefer following test driven development here: writing the tests first, and iterating over the implementation until the tests pass. Since you are using an AI agent to write out code, it is very important for you to not only review it, but also write test cases that can give you the confidence that the code is functional, and edge cases are covered. Before you git push, use the /clear command to reset the context and then ask the AI to review the diff. This is a powerful use case: it’s very good at identifying violations in your codebase’s conventions (especially if you supply a conventions document) and can act as a valuable second opinion against general best practices, potentially even catching a subtle logic bug that went unnoticed during manual review.
Remember, at the end of the day, an LLM is simply a word prediction machine. You are in the driver’s seat because you, as a human, can think, imagine and be creative. These tools are simply speed boosters that can help you get to your finish line faster, but they cannot take over critical thinking. And that’s still the greatest strength of us humans.
Bonus Section: Advanced Agentic Workflow Tips
Here are some tips from our engineers of what works (and what doesn't) when using these agentic tools in the real world. The core principle is simple: you are not offloading responsibility, you are extending your capabilities. The human must remain in the loop.
Context Management and Agent Orchestration
- Sub-Agents as Specialists: Running multiple agents usually means running multiple instances (e.g., via tmux) with different system prompts. Use specialized sub-agents (like a Playwright agent) for specific tasks, and then feed their QA-like feedback back to the main agent.
- Permission Mode: Always start your workflow in normal mode, not skip-permissions mode. Reviewing and accepting changes as the agent suggests them is crucial to staying connected to the codebase and avoiding "code review hell" later.
Mastering the CLI and Git
- Know the Agent's Tools: Since agents operate in the terminal, it's worth getting good at the terminal itself. Agents rely on standard Unix tools like grep, sed, awk, xargs, find, and diff. Understanding these helps you debug what the agent is doing.
- Optimize Unix Tools: Agents often use common Unix tools (e.g., Claude Code often uses grep). You can replace these defaults with faster alternatives like ripgrep (rg) by modifying your agent's settings.
- Clean Start with Git: Always commit all current changes before starting a session or letting the agent modify anything. This provides a clean workspace and gives you a clear diff of the agent's work.
- Incremental Commits: Use the agent to group large, multi-file changes into smaller, logical commits and prompt it to write descriptive commit messages for each. This makes for much cleaner commit histories.
- Fine-Grained Git Control: Learn advanced Git features like interactive staging (git add -p), partial commits, and stashing. These pair extremely well with agentic workflows by giving you fine-grained control over what changes end up in version control.
